Let’s be real, store-bought hummus is fine in a pinch, but nothing compares to the fresh, creamy, and ridiculously flavorful world of homemade hummus. You might think you need a bulky, hard-to-clean food processor to achieve that perfect texture, but I’m here to let you in on a little secret. The ultimate, easy Hummus Recipe Personal Blender method is not only possible, it’s a total game-changer. Your compact, go-to smoothie maker is about to become your new favorite kitchen sidekick for creating the dip of your dreams. Forget the mess and the giant cleanup; we’re diving into a world of quick, delicious, and perfectly portioned hummus that will make you wonder why you ever bought it in a tub.
The 5-Minute Creamy Hummus Recipe Your Personal Blender Will Love
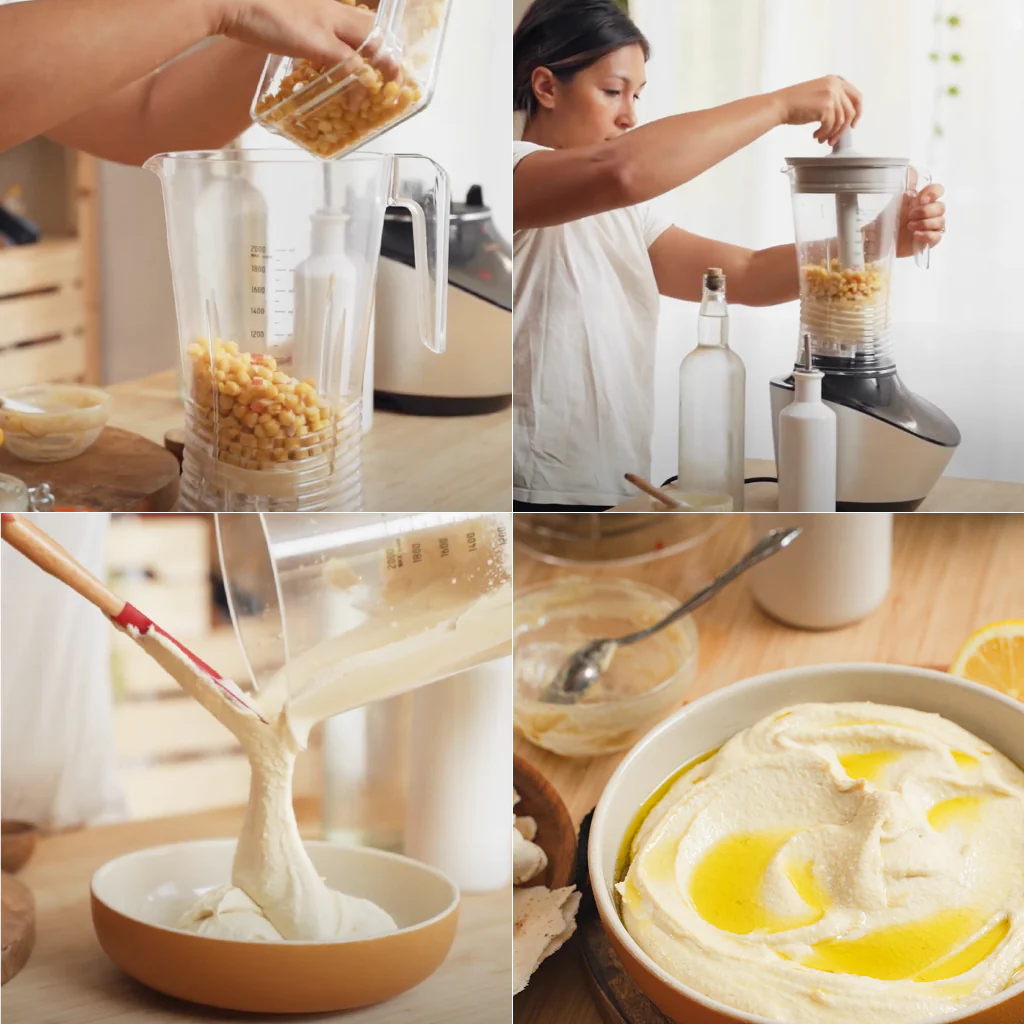
Ready to be amazed? This recipe is all about simple ingredients and maximum flavor. The key is the order in which you blend things and a couple of pro tips to get that silky-smooth texture, even in a compact blender.
Ingredients You’ll Need:
- One 15-ounce (425g) can of chickpeas, rinsed and drained
- 1/4 cup (60 ml) of fresh lemon juice (from 1-2 lemons)
- 1/4 cup (60 ml) of well-stirred tahini
- 1 large clove of garlic, roughly chopped
- 1/2 teaspoon of ground cumin
- 1/2 teaspoon of salt
- 2-4 tablespoons of ice-cold water
- 2 tablespoons of extra virgin olive oil for serving
Step-by-Step Instructions:
- The Flavor Base: In your personal blender cup, combine the tahini and lemon juice first. Blend for about 30-45 seconds. This step is crucial! It “whips” the tahini, making the final hummus much creamier. Scrape down the sides if needed.
- Add the Aromatics: Add the chopped garlic, cumin, and salt to the whipped tahini mixture. Give it another quick blend for 20-30 seconds to incorporate everything smoothly.
- The Star of the Show: Now, add half of the chickpeas to the blender cup. Blend until smooth, which might take a good minute.
- Finish it Off: Add the remaining chickpeas and blend again until you have a thick, consistent paste. This is where you’ll see the power of your personal blender at work.
- Achieve Perfection: With the blender running on low (if it has speed settings) or in short pulses, slowly drizzle in the ice-cold water, one tablespoon at a time. This is the secret to a light, fluffy texture. Stop when you’ve reached your desired creaminess. I usually find 3 tablespoons is the sweet spot.
Serve in a bowl, make a little well in the center, and drizzle with high-quality extra virgin olive oil. A sprinkle of paprika or fresh parsley is a classic touch.
Why Is a Personal Blender Perfect for Hummus?
A user searching for a hummus recipe personal blender is onto something brilliant. While traditional blenders or food processors are great, the personal blender offers unique advantages for this specific task.
It’s all about efficiency and control. A personal blender’s smaller container means the blades are in constant contact with the ingredients. There’s less space for chickpeas to hide, resulting in a smoother blend with less scraping. You’re not trying to blend a small amount of dip in a giant pitcher; you’re using the right tool for the job. It’s perfect for making a fresh batch for two or for a week’s worth of personal snacks without the food waste.
“I always recommend a personal blender to my clients for making things like hummus or pesto. The smaller batch size encourages freshness, and the easy cleanup means they’re more likely to consistently make healthy choices instead of reaching for processed options.” – Dr. Alisha Chen, Registered Dietitian
Creative Ways to Use Your Personal Blender (Beyond Smoothies)
Your personal blender is so much more than a smoothie machine. Once you’ve mastered the hummus, a whole new world of culinary possibilities opens up.
- Pesto Perfection: Blend fresh basil, pine nuts, garlic, parmesan, and olive oil for a vibrant pesto.
- Dreamy Dressings: Emulsify vinaigrettes and creamy salad dressings in seconds. No more endless whisking!
- Nut Butters: With a powerful motor, you can make small-batch almond or peanut butter. Just be sure to give your blender breaks to avoid overheating.
- Quick Salsas: Pulse tomatoes, onion, jalapeño, cilantro, and lime juice for a fresh restaurant-style salsa.
- Grinding Spices & Oats: Need oat flour for a recipe? Or freshly ground flaxseed? Your personal blender can handle it.
Personal Blender vs. Traditional Blender: What’s the Difference?
Wondering if you should use your big countertop blender or your personal one? It depends on the task. Here’s a quick breakdown.
| Feature | Personal Blender | Traditional Blender |
|---|---|---|
| Capacity | Small (8 – 32 oz) | Large (48 – 64 oz) |
| Best For | Single servings, dips, dressings, small batches | Large batches, soups, frozen cocktails, families |
| Footprint | Compact, easy to store | Bulky, takes up counter space |
| Cleanup | Very easy; cup and blade assembly | More parts to clean |
| Portability | Excellent; many have travel lids | Not portable |
For a quick and easy hummus recipe personal blender is the clear winner due to its perfect sizing and effortless cleanup.
Essential Features for Your Hummus-Making Blender
If you’re in the market for a new personal blender, especially with tasks like hummus in mind, there are a few key features to look for.
Power is Key
Look for a motor with at least 600-900 watts. This is the sweet spot for providing enough torque to break down tough ingredients like chickpeas into a velvety-smooth consistency without struggling.
Blade Design Matters
You don’t just want sharp blades; you want well-designed blades. Look for a stainless steel blade assembly with multiple prongs at different angles. This creates a better vortex, pulling ingredients down and ensuring nothing gets left behind.
Quality of the Cup
Opt for a blender cup made from BPA-free Tritan plastic. It’s durable, shatter-resistant, and won’t absorb odors or stains from ingredients like garlic or cumin.
Tips for Cleaning and Maintaining Your Personal Blender
Keeping your personal blender in top shape is incredibly simple and ensures it’s always ready for your next culinary creation.
- The 30-Second Clean: As soon as you’re done blending, rinse the cup and blade assembly with warm water.
- Add a Drop of Soap: Fill the cup about halfway with warm water and add a single drop of dish soap.
- Blend it Clean: Screw the blade assembly back on, place it on the motor base, and blend for 20-30 seconds. The soapy water will clean the blades and the inside of the cup effortlessly.
- Rinse and Dry: Rinse everything thoroughly with clean water and let it air dry. It’s that easy!
Frequently Asked Questions
Can you really make good hummus in a personal blender?
Absolutely! The compact size is actually an advantage, as it keeps the ingredients in constant contact with the blades, leading to an incredibly smooth and creamy texture. The key is to add liquids like tahini and lemon juice first.
Is a personal blender powerful enough to handle chickpeas?
Yes, most modern personal blenders with motors of 600 watts or more are perfectly capable of breaking down canned chickpeas into a smooth paste. For the best results, make sure your chickpeas are well-rinsed.
My hummus is too thick in the blender, what should I do?
This is a common and easy fix! While the blender is running (or in between pulses), slowly drizzle in one tablespoon of ice-cold water at a time until you reach your desired consistency. The ice-cold water also helps make the hummus lighter and fluffier.
Do I need to peel the chickpeas for my personal blender hummus recipe?
You don’t have to, but if you want the absolute smoothest, most velvety hummus possible, peeling them makes a noticeable difference. It’s a bit time-consuming, but for hummus aficionados, it’s worth the extra step.
Can I double this hummus recipe in my personal blender?
It depends on the size of your blender cup. Most personal blenders are designed for single batches. Attempting to overfill the cup can strain the motor and lead to a chunky, uneven blend. It’s better to make two separate fresh batches.
Your Partner in Healthy Eating
Making fresh, delicious dips at home is a simple step towards a healthier lifestyle, and your personal blender is the perfect tool to make it happen. This hummus recipe Personal Blender guide is just the beginning. By choosing the right device and unleashing its creative potential, you’re not just buying an appliance; you’re investing in a versatile companion for your wellness journey. So go ahead, blend up a batch of creamy hummus, and taste the fresh, flavorful difference for yourself.