Ever have one of those mornings? You know the one. The alarm blares, you’re already running ten minutes late, and the idea of a nutritious breakfast feels like a distant dream. That’s where learning how to make smoothies with a personal blender can completely change your game. This isn’t just about mixing fruit; it’s about creating a powerful, portable nutrition hub that fits seamlessly into your busy life. Forget clunky, hard-to-clean kitchen gadgets. We’re diving deep into the world of single-serve blending to show you how this compact powerhouse can become your best friend in the quest for a healthier, more convenient lifestyle. Many people are looking for inspiration for what to put in their blenders, which is why we’ve also explored some trending TikTok blender recipes to get your creative juices flowing.
What is a Personal Blender and Who Is It For?
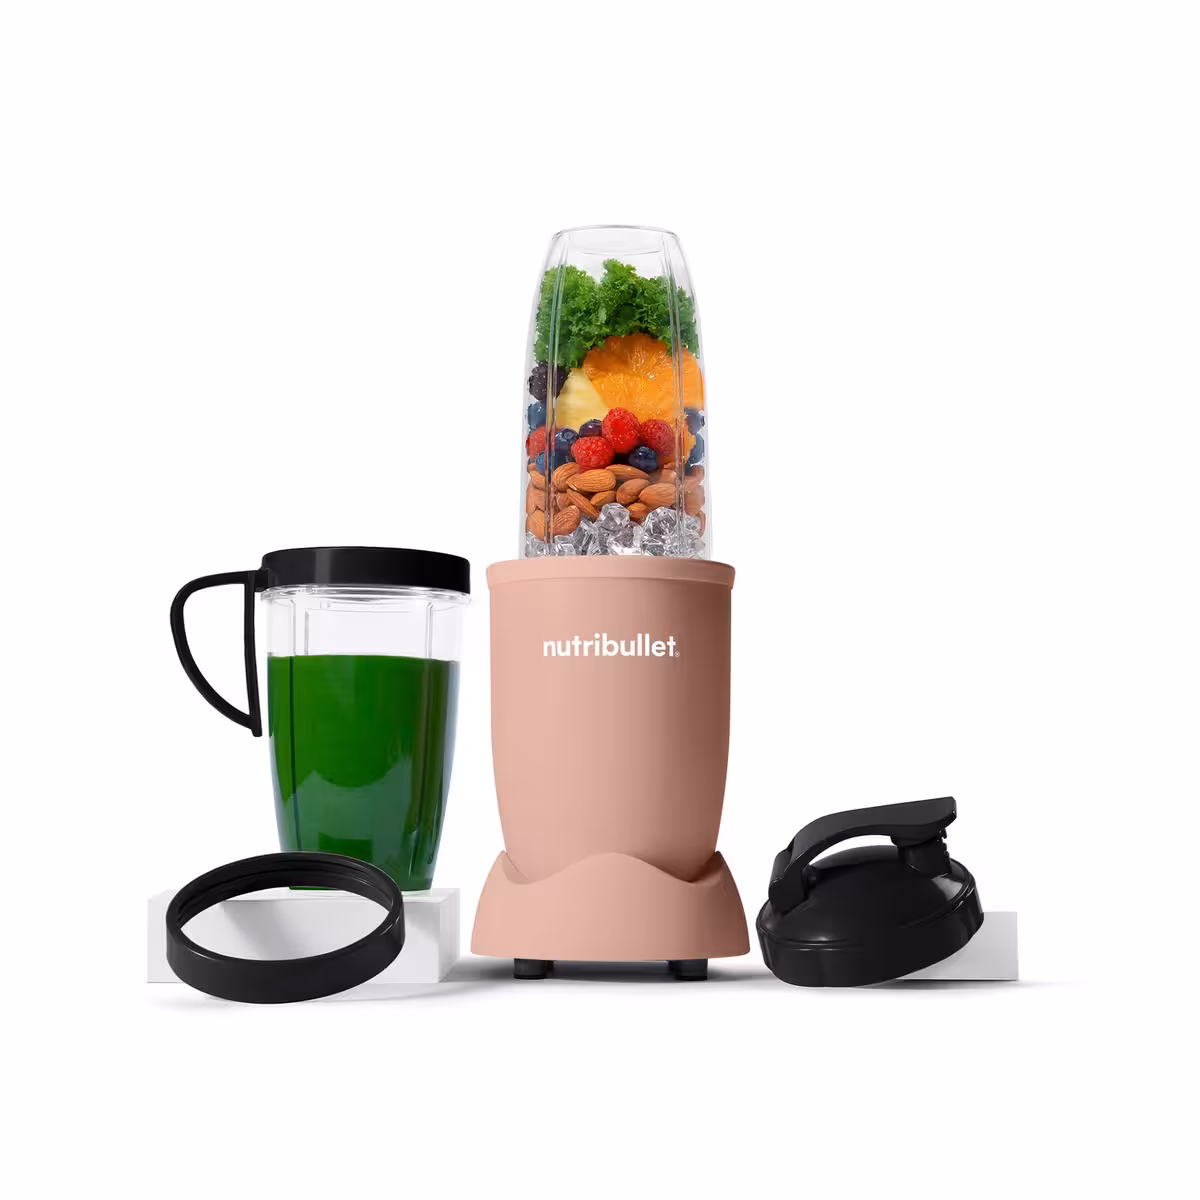
A personal blender is a compact, single-serving blending appliance designed for speed and convenience. Unlike its bulky countertop cousins, its blending container doubles as a to-go cup, complete with a travel lid. You blend and go, all in one vessel.
So, who is this little gadget perfect for?
- The Busy Professional: You need a nutrient-dense breakfast you can sip during your commute or at your desk. No time for a sit-down meal? No problem.
- The Fitness Enthusiast: It’s the ultimate tool for whipping up pre- or post-workout protein shakes right when you need them.
- The Student: Living in a dorm or small apartment with limited kitchen space? A personal blender is your space-saving solution for healthy meals.
- The Health-Conscious Parent: Quickly make a single serving of a healthy smoothie for yourself or a small portion of pureed food for a toddler without the hassle of a large machine.
Essentially, if you value efficiency, portion control, and easy cleanup, a personal blender was made for you.
Key Benefits of Using a Personal Blender
Why has this appliance become so popular? The benefits go far beyond just its small size. It’s a lifestyle tool that simplifies healthy living.
- Ultimate Convenience: The blend-and-go design is the star of the show. It drastically cuts down on preparation and cleaning time.
- Perfect Portion Control: The single-serving cups help you manage ingredient quantities, preventing overeating and reducing food waste. This is crucial for anyone tracking their calories or macros.
- Space-Saving Design: Its small footprint makes it ideal for kitchens of any size, from sprawling suburban homes to tiny city apartments.
- Ease of Cleaning: Let’s be honest, nobody likes cleaning a traditional blender pitcher. Most personal blender cups and blades are dishwasher-safe, and a quick rinse with soap and water is often all that’s needed.
- Nutrient Extraction: A quality personal blender is powerful enough to break down fibrous greens, tough seeds, and frozen fruit, unlocking vitamins and minerals for better absorption.
“A personal blender is a game-changer for my clients who need a quick, nutrient-packed breakfast post-workout,” says Dr. Alisha Chen, a registered dietitian and sports nutritionist. “The ability to get high-quality protein and antioxidants into their system within that critical 30-minute recovery window, without a complicated cleanup, is invaluable.”
Essential Features to Look for in a Personal Blender
Not all personal blenders are created equal. When you’re ready to buy, here are the non-negotiable features you should be looking for to master how to make smoothies with a personal blender effectively.
- Motor Power (Watts): This is the engine of your blender. For smooth, chunk-free results, especially with frozen ingredients and ice, look for a motor with at least 300 watts. For those who want to pulverize tough nuts and seeds, aiming for 500-900 watts is a smart move.
- Blade Design and Material: The blades do the heavy lifting. Look for high-quality, stainless steel blades. A multi-pronged design (four or six points) is often more efficient at creating a vortex that pulls ingredients down for a consistent blend.
- Container Material and Size: The cup should be durable and safe. Look for BPA-free Tritan plastic, which is shatter-resistant and won’t absorb odors or stains. Sizes typically range from 12 to 24 ounces, so choose one that fits your typical portion size.
- Portability and Lids: Since the main benefit is convenience, check the lids. A secure, leak-proof travel lid with a spout for easy sipping is a must-have.
- Ease of Use: Simple, one-touch operation is best. You don’t need a complicated control panel with ten buttons. The best designs are intuitive—just push and twist to blend.
Personal Blender vs. Traditional Blender: What’s the Difference?
Are you wondering if you can just use your big countertop blender? You can, but each is designed for a different purpose. Here’s a quick breakdown:
| Feature | Personal Blender | Traditional Blender |
|---|---|---|
| Capacity | Single Serving (12-24 oz) | Large Batches (48-64 oz) |
| Footprint | Small, compact | Large, requires counter space |
| Best For | Smoothies, protein shakes, on-the-go | Soups, sauces, large family meals |
| Power | Moderate (300-900W) | High (1000W+) |
| Cleaning | Very easy, often dishwasher-safe | More components, can be cumbersome |
| Convenience | High (blend-and-go) | Lower (requires transferring) |
The Golden Rules: How to Make Smoothies with a Personal Blender Perfectly Every Time
Ready for the magic? Making a perfect smoothie in a personal blender is part science, part art. It boils down to a simple formula and a crucial layering technique.
The Perfect Smoothie Ratio
Think of this as your foundational blueprint. For a roughly 16-ounce smoothie, use:
- Liquid Base (Fill to the MAX line, about 1-1.5 cups): This is essential for blending. Options include water, coconut water, almond milk, oat milk, or regular milk.
- Leafy Greens (1 large handful): Spinach is a great starter as it has a mild flavor. Kale is another nutrient-packed option.
- Fruit (1 cup, preferably frozen): Frozen fruit is the secret to a thick, cold smoothie without watered-down ice. Think bananas, berries, mango, or pineapple.
- Healthy Fats & Boosters (1-2 tablespoons): This adds creaminess and staying power. Choose from avocado, chia seeds, flax seeds, nut butter, or protein powder.
The All-Important Layering Technique
Because you invert the cup to blend, the order you add ingredients matters immensely. You load it in reverse of a traditional blender.
- Step 1: Add Leafy Greens & Boosters First. Start with your spinach, protein powder, and seeds. These lighter ingredients will be at the top when you flip it over.
- Step 2: Add Your Soft Fruits/Veggies. Next come things like fresh banana, avocado, or yogurt.
- Step 3: Add Frozen Ingredients. Now add your frozen fruit or ice. These heavier, harder ingredients need to be closest to the blade to get pulverized first.
- Step 4: Pour in Your Liquid Last. Finally, add your liquid base. Don’t overfill! Respect the “Max Fill” line on your cup to give the ingredients room to move.
- Step 5: Blend! Screw on the blade base, flip the cup, place it on the motor, and blend. Start with a few short pulses to break up the frozen chunks, then blend continuously for 30-60 seconds until smooth and creamy.
Creative Ways to Use Your Personal Blender (Beyond Smoothies)
Your personal blender is more versatile than you think! Once you’ve mastered smoothies, try these:
- Salad Dressings: Combine olive oil, vinegar, herbs, and a little mustard for a fresh, homemade vinaigrette in seconds.
- Dips and Sauces: Whip up a single serving of pesto, hummus, or a creamy sauce for pasta. It’s also surprisingly effective for making fresh salsa. In fact, to understand more about how to get the perfect consistency, exploring a specialized salsa recipe blender guide can provide some excellent tips.
- Protein Pancake Batter: Mix up a quick, lump-free batter for one or two pancakes using oats, egg, and protein powder.
- Quick Marinades: Blend garlic, ginger, soy sauce, and other spices for a fast and flavorful meat or tofu marinade.
Tips for Cleaning and Maintaining Your Personal Blender
To keep your blender in top shape, proper care is key. Luckily, it’s incredibly easy.
- The 30-Second Clean: As soon as you’re done with your smoothie, rinse the cup and blade base. Then, fill the cup halfway with warm water, add a drop of dish soap, and blend for 10-15 seconds. Rinse again, and you’re done!
- Deep Cleaning: For a more thorough clean, most cups, lids, and blade assemblies are top-rack dishwasher safe (always check your manual!).
- Fight Odors and Stains: If your cup starts to look cloudy or smell funky, fill it with a mixture of white vinegar and water and let it sit for a few hours before washing.
- Check the Gasket: The small rubber ring on your blade base can trap gunk. Carefully remove it with a dull knife every so often and wash it thoroughly. Make sure it’s completely dry before putting it back.
Frequently Asked Questions (FAQ)
Can I put frozen fruit in a personal blender?
Absolutely! In fact, it’s recommended. Frozen fruit is the key to a thick, creamy smoothie without needing to add ice, which can water down the flavor. Just make sure your blender has at least 300 watts of power to handle it effectively.
Can I blend hot liquids in my personal blender?
No, this is generally not recommended. Blending hot liquids creates steam and pressure inside the sealed cup, which can be dangerous and may damage your blender. Stick to cool or room-temperature ingredients.
Why is my smoothie still chunky?
This usually comes down to one of three things: not enough liquid, an improper layering order, or over-packing the cup. Try adding a splash more liquid and make sure your harder, frozen ingredients are loaded last so they are closest to the blade.
How powerful does my personal blender need to be?
For basic fruit smoothies, 300 watts is sufficient. If you plan to regularly blend hard items like nuts, seeds, ice, or fibrous greens like kale, you will be much happier with a model in the 500-900 watt range for a smoother consistency.
Can I make nut butter in a personal blender?
While some high-powered personal blenders can handle it, it’s not their primary function. The smaller capacity and motor can overheat during the long blending time required for nut butter. It’s best to stick to a full-sized blender or food processor for that task.
Your Journey to Effortless Nutrition Starts Here
Learning how to make smoothies with a Personal Blender is more than just a kitchen skill; it’s an investment in your health and well-being. It’s about reclaiming your mornings, fueling your body with wholesome ingredients, and finally making that healthy lifestyle feel effortless and sustainable. By choosing the right machine and mastering a few simple techniques, you’re not just buying an appliance—you’re gaining a reliable partner for your daily wellness journey. Now go ahead, blend up something delicious, and take on your day.